×

Archive

How to connect Linux VPS using Putty?

A VPS, short for virtual private server’, is a virtual machine with hardware resources dedicated to you. One of the key advantages of this solution is its cost, as it is has a much more affordable price tag than a standard dedicated server.

Linux VPS can be connected using SSH, Command line or terminal or you can also use SSH applications like Putty or mRemote application. Currently in this blog, we are discussing how you can connect your Linux vps using putty. Here’s a step-by-step guide on how to connect to your Linux VPS using PuTTY:

Before you begin:

Make sure you have your VPS’s IP address, username, and password readily available. You should have received these details on your email id.

Download and install PuTTY from the official website: https://www.putty.org/

Step 1: Open PuTTY: Launch the PuTTY application on your computer.

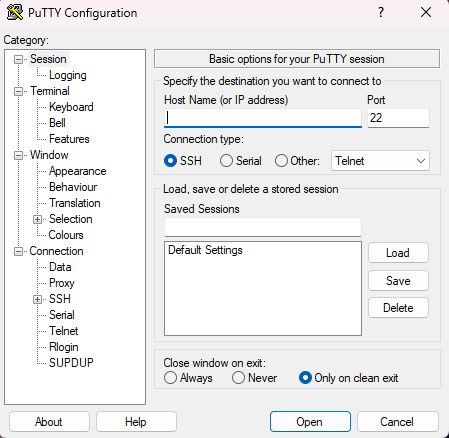
Step 2. Enter connection details: In the “Host Name (or IP address)” field, enter the IP address of your VPS.

Step 3: Select “SSH” under “Connection type”.

Step 4: Leave the remaining settings on their default values unless specified or guided by your System Administrator.

Step 5: Establish connection: Click the “Open” button.

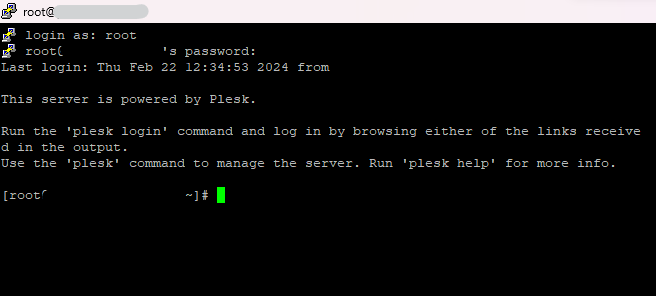
Step 6: Security key confirmation: The first time you connect to a server, PuTTY might display a security key confirmation message. This is normal. Click “Yes” to accept and save the key.

Step 7: User login: You will be prompted to enter your username. Type your VPS username and press Enter.

Step 8: Password and authentication: Enter your VPS password. Note: You won’t see the password characters as you type for security reasons. Press Enter again.

Successful connection: If the credentials are correct, you’ll be logged in to your VPS and see a terminal window displaying the VPS command prompt.

Additional notes:

Alternative authentication: Consider using SSH key pair authentication for increased security. This method eliminates the need to type your password every time you connect.

Troubleshooting: If you encounter any issues connecting, double-check your credentials and firewall settings. Ensure SSH is enabled on your VPS. Consider referring to your VPS provider’s documentation for further assistance.

For your safety:

Never share your VPS credentials with anyone.

Use strong and unique passwords for your VPS.

Consider enabling two-factor authentication for additional security.

How to connect your Forex VPS?

Forex VPS: Trading uninterrupted, 24/7, even when your computer sleeps.

Imagine a world where your Forex trades execute seamlessly, 24 hours a day, 7 days a week, even if your home computer crashes or the internet flickers. That’s the power of Forex VPS, a virtual server dedicated to keeping your trading edge sharp.

But what exactly is a Forex VPS?

Think of it as a remote, high-performance computer specifically designed for Forex traders. It runs in the cloud, independent of your personal device, ensuring:

Uninterrupted connection: No more worries about power outages, internet disruptions, or software glitches stopping your trades. Forex VPS runs 24/7, keeping your connection to the market rock-solid.

Blazing-fast execution: Located near major trading hubs, Forex VPS servers boast superior internet speeds, minimizing latency and ensuring your orders execute swiftly. Fractions of seconds matter in Forex, and VPS gives you the edge.

Enhanced security: VPS servers are fortified with robust security measures, safeguarding your trading data and preventing unauthorized access. Trade with peace of mind, knowing your investments are protected.

Automated trading freedom: Deploy trading robots (Expert Advisors) on your VPS to automate strategies and react to market changes even while you’re away. Let the VPS handle the heavy lifting while you focus on analysis and decision-making.

Now let’s check how can we connect our Forex VPS using RDP or Remote Desktop Connection

Step 1: Go to your Start Menu in your laptop or desktop as display in screenshot below

Step 2: Search for “Remote Desktop Connection” in your menu as displayed in screenshot below

Note: if you are using Mac you may need to download Remote Desktop connection online. Or you can download or install “Microsoft Remote Desktop” from your Apple Store

Step 3. Once you open this you will get dialog box like displayed below:

Step 4: Now you need to enter IP address in place or Computer as displayed in screenshot below and then click on Connect Button:

Step 5: Once you click on Connect you will be asked for Credential Details Enter your username and password which you received on email as displayed below and you can also select Remember me so you don’t have to enter Username password when connecting to your vps next time. Then click on Ok button.

Step 6: When you click on ok button You will be logged in to your VPS RDP Session as displayed below where you will get Full Windows System Layout and then you can start working

Remember: Forex VPS is an investment, but the potential benefits in terms of efficiency, security, and peace of mind can be significant. Weigh your trading needs and risk tolerance before making a decision.

Ready to explore the world of Forex VPS? Do your research, compare providers, and choose a plan that aligns with your trading style and budget. Trade smarter, not harder, with the power of Forex VPS at your fingertips with Hapih Host

How to Connect RDP Remote Desktop Server in Windows VPS?

A Virtual Private Server (VPS) is a type of hosting service that uses virtualization technology to create multiple virtual machines on a single physical server. Each VPS acts like a dedicated server, with its own operating system, resources, and applications. However, unlike a dedicated server, a VPS shares the physical hardware resources of the underlying server with other VPSs.

A Windows VPS (Virtual Private Server) is a specific type of VPS that comes pre-installed with the Windows operating system, instead of Linux which is more common. This means you get the familiarity and functionality of Windows on a virtual server, offering similar advantages to a regular VPS but tailored for Windows users and applications.

RDP, or Remote Desktop Protocol, is a secure network communication protocol developed by Microsoft. It allows you to connect to a remote computer and interact with it as if you were sitting in front of it. This means you can see the remote computer’s desktop, open and close applications, and use files and resources just like you would on your local machine.

Now let’s check how can we connect our Windows VPS or Windows VPS RDP or Remote connection to your Windows VPS.

Step 1: Go to your Start Menu in your laptop or desktop as display in screenshot below

Step 2: Search for “Remote Desktop Connection” in your menu as displayed in screenshot below

Note:  if you are using Mac you may need to download Remote Desktop connection online. Or you can download or install “Microsoft Remote Desktop” from your Apple Store

Step 3. Once you open this you will get dialog box like displayed below:

Step 4: Now you need to enter IP address in place or Computer as displayed in screenshot below and then click on Connect Button:

Step 5: Once you click on Connect you will be asked for Credential Details Enter your username and password which you received on email as displayed below and you can also select Remember me so you don’t have to enter Username password when connecting to your vps next time. Then click on Ok button.

Step 6: When you click on ok button You will be logged in to your VPS RDP Session as displayed below where you will get Full Windows System Layout and then you can start working

Hope this article will help you to login to your vps RDP easily. And if you haven’t purchased Windows VPS or planning to buy windows VPS plans you can check our windows VPS plans at Self Managed Windows VPS Hosting and Fully Managed Windows VPS Hosting In self Managed VPS there is no support from our side we will only keep your machine up and running and basic support like Restart, Reboot, Reinstall OS. Whereas in fully managed VPS you can raise a ticket for any issues our team will check and resolve it for you.